
A cedar log home needs care right after the build is done, not months later. If I want the wood to last, I need to stain and seal exposed areas early, check the home every spring and fall, keep indoor humidity at 20% to 30%, and watch for finish failure on sun-heavy walls every 3 to 7 years.
Here’s the short version:
- finish exposed cedar wood fast once the roof and trim are in place
- Inspect twice a year: spring and fall
- Watch south- and west-facing walls first because UV wears them down sooner
- Seal upward-facing checks over 1/4 inch
- Keep water away from the first log row with proper drainage, gutters, and clearance
- Keep shrubs about 3 feet back
- Check moisture before recoating and keep wood under 18%
- Track receipts, photos, and product names for warranty records
A few numbers matter most:
- Cedar often leaves the mill at about 14% to 16% moisture
- Downspouts should move water at least 5 feet from the foundation
- Soil or mulch should stay 6 to 8 inches below the first log row, though some specs call for 12 to 18 inches
- Log end sealers may last about 5 to 10 years
- Clear coats on high-exposure walls may need attention in 2 to 4 years
If I had to sum up the whole article in one line, it would be this: keep the wood dry, keep the finish working, and write down every maintenance step. If you are still in the planning phase, you can request a free estimate for your project.
MAINTENANCE – MAKING LOG HOMES LAST
sbb-itb-1086e16
Know Which Parts of Your Home Need Regular Attention
Not every part of a cedar log home ages at the same pace. The spots that get hit by sun, rain, and damp conditions usually need the most care, so start there.
Logs, Finish, Caulking, and Exposed Joints
South- and west-facing walls usually show finish wear first because they get the most UV exposure [8][2]. On those walls, the stain takes the direct hit, while the clear topcoat helps protect the stain on your cedar log home kit [1][4].
Log ends need extra attention too, especially corner logs, purlins, and decking posts. That’s because end grain pulls in water faster than flat log surfaces [4][6]. Upward-facing checks need a close look, and any check wider than 1/4 inch should be sealed to keep water out [8][2].
Caulking also plays a big part here. Around windows, doors, and log-to-log joints, it helps keep air and water from getting into the wall system. Inspect those areas every year [3][2].
Roof, Gutters, Drainage, Porches, and Decks
Clogged gutters are a major cause of log rot, and downspouts should move water at least 5 feet away from the foundation [8].
Ground slope and clearance matter just as much. Keep 6 to 8 inches of space between soil or mulch and the first log row; some specifications call for 12 to 18 inches [8]. That gap helps cut down on moisture wicking and pest pressure. Porches and decks should slope away from the structure so water can drain off, and deck ledger attachments deserve a close inspection for signs of water intrusion [3][6].
Interior Humidity and Ventilation Systems
Keep indoor humidity between 20% and 30% to limit log movement and mold growth. Use a humidifier or dehumidifier if needed, and check levels year-round with a humidity meter [6].
Use these areas as the core of your spring and fall inspections.
Build a Maintenance Schedule You Can Repeat Every Year
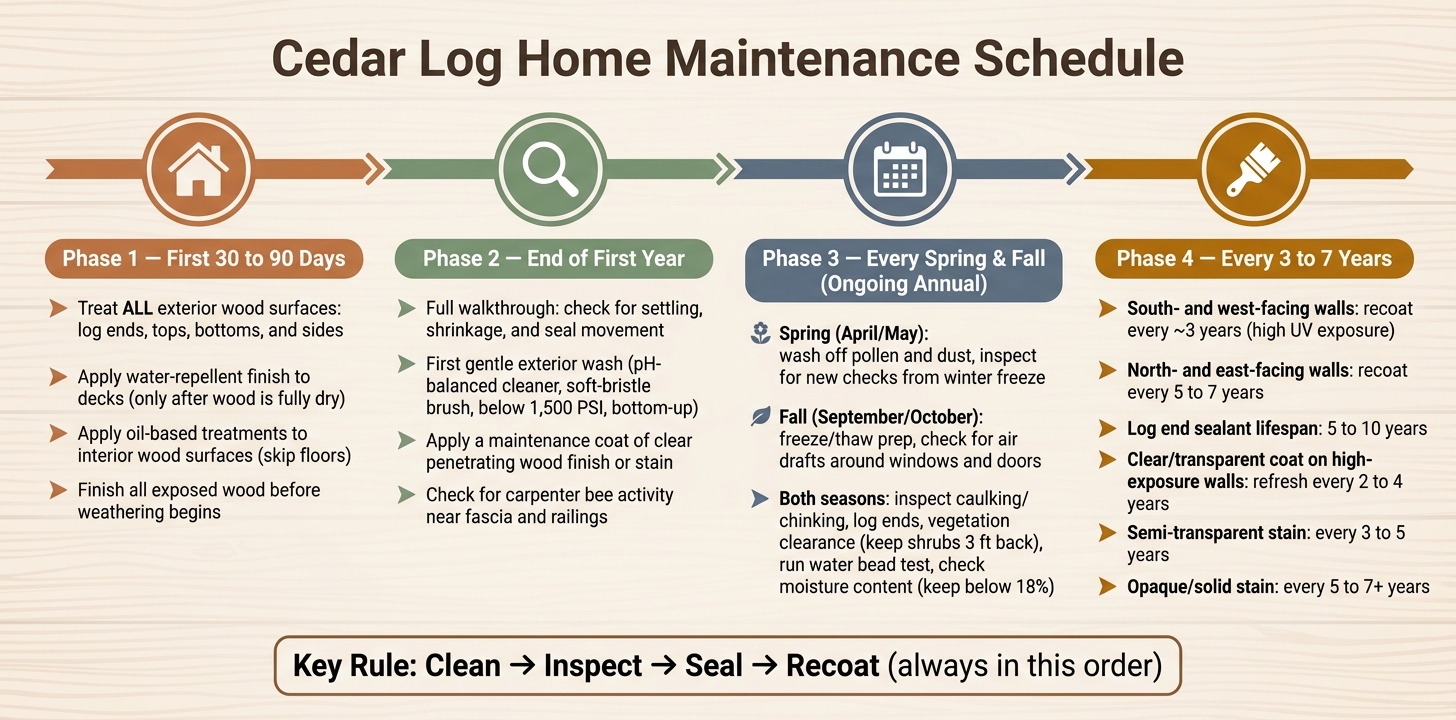
Cedar Log Home Maintenance Schedule: First 90 Days to 7 Years
A one-time checklist won’t do much for a log home. What works is a schedule you can run every year without having to rethink it.
Set it up in three parts: the first 30 to 90 days, spring and fall checks, and the longer 3- to 7-year recoat cycle. Stick to the timing in your finish and sealant warranty, and write down each step as you go. If you’re unsure about your specific home’s needs, book a free consultation with a specialist. Use the same inspection points from the previous section, then repeat them on this schedule.
The First 30 to 90 Days and the First Year
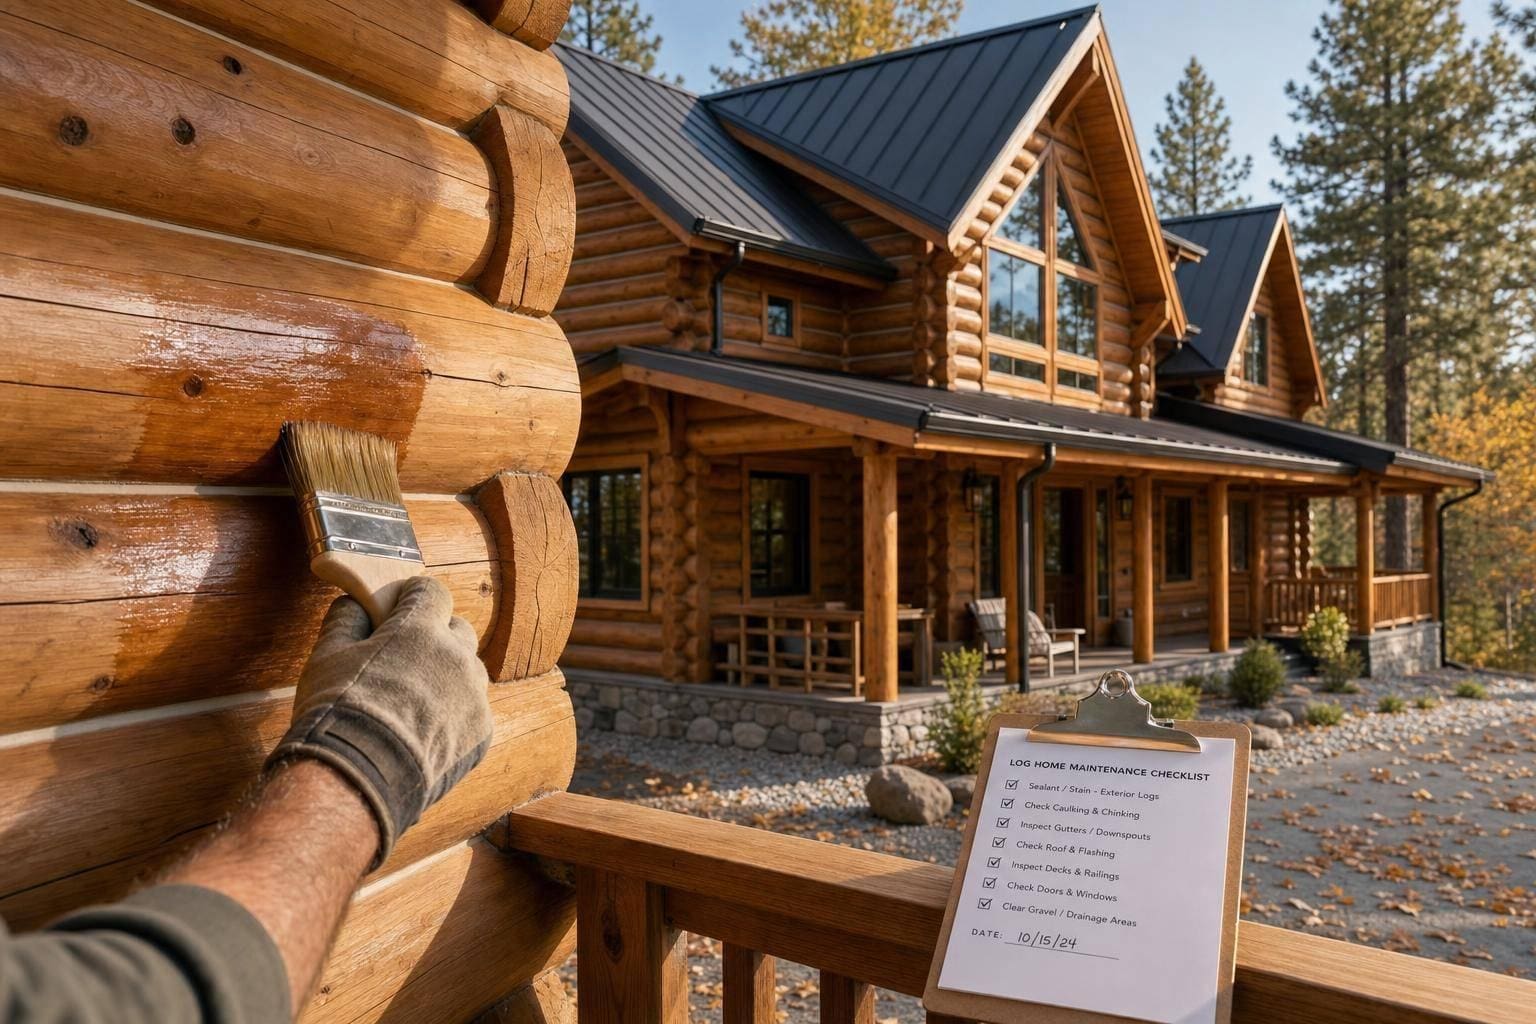
During the first 30 to 90 days after construction, treat all exterior wood surfaces right away, including log ends, tops, bottoms, and sides [3]. Exposed wood should be finished before weathering starts [3]. For decks, apply water-repellent finishes only after the wood is fully dry. For interior wood surfaces, use oil-based treatments, but skip the floors [3].
By the end of the first year, do a full walkthrough and check for settling, shrinkage, and seal movement that may have shifted door and window seals or affected chinking [3]. This is also the right time for the first gentle exterior wash. Use a log-safe cleaner with a soft-bristle brush or a low-pressure garden hose, and work from the bottom up so you don’t get streak staining [8]. Stay away from pressure washers at 1,500 PSI or more because they can tear up wood fibers [8]. After washing, apply a clear penetrating wood finish or stain with water-repellent protection by the end of the first year [3].
Spring and Fall Inspection Checklist
Run the same check every spring, usually April or May, and every fall, usually September or October [8]. In spring, wash off pollen and dust because they trap moisture, and look for new checks that opened during winter [8]. In fall, shift to freeze/thaw prep and check for air drafts around windows and doors [8].
Each season, walk every wall and look for:
- Faded finish
- Dark streaks after rain
- Open gaps in caulking or chinking
- Vegetation getting too close to the logs
- Small sawdust piles near fascia boards and railings
Keep bushes and shrubs at least 3 feet away from log walls [8]. If you spot small sawdust piles near fascia boards and railings, that’s a sign of carpenter bee activity [8].
The 3- to 7-Year Finish and Sealing Cycle
After the first-year walkthrough, the focus shifts from basic inspection to how well the finish is holding up. Recoat timing depends on wall direction, overhang coverage, local climate, and the product you used. South- and west-facing walls usually need a maintenance coat every 3 years because they take direct UV exposure. North- and east-facing walls can often go 5 to 7 years between coats [8].
Here’s a simple field test: spray the upper logs with water. If the water beads up and runs off, the finish is still doing its job. If it soaks in or darkens the wood, it’s time to recoat [8].
| Maintenance Window | Key Tasks |
|---|---|
| 30–90 Days | Treat all exterior/interior wood surfaces; apply deck water-repellent; finish exposed wood before it weathers |
| First Year | Inspect for settling, shrinkage, and seal movement; perform the first gentle wash; apply a maintenance coat; check for carpenter bees |
| Spring/Fall | Check caulking/chinking; inspect log ends; trim vegetation back; perform the water bead test; check for air drafts |
| 3–7 Years | Assess finish for UV damage; apply maintenance coat to high-exposure south- and west-facing walls |
How to Clean, Inspect, Seal, and Recoat Exterior Cedar Log Surfaces
After your spring or fall inspection, handle worn areas in a simple order: clean, inspect, seal, then recoat. That order matters. If you jump ahead and add finish too soon, you can lock moisture under the new coating.
How to Wash Log Walls Without Damaging the Wood
Start by protecting nearby openings. Then wash the surface with a pH-balanced log cleaner. Skip bleach. It can be too harsh on the wood and on the finish already in place.
Apply the cleaner from the bottom up so you don’t get streaks. Scrub with a soft-bristle brush to loosen dirt and pollen, then rinse with low pressure. Stay below 1,500 PSI. It also helps to use a cleaner that is approved for your current stain system.
Let the logs dry for 2 to 3 days. Before you seal or recoat anything, check moisture content and make sure it’s below 18%.
Once the wood is dry and under that moisture limit, move on to checks and gaps.
How to Seal Checks, Cracks, and Gaps That Can Hold Water
Only seal after the logs are clean and dry. Checks are normal drying splits in the wood. Still, some need attention. Seal upward-facing checks wider than 1/4 inch because they can hold water and lead to rot over time [8].
Clear out any debris first, then let the check dry all the way. After that, apply a log-compatible sealant and smooth it flush so water runs off instead of sitting there. Use that same method around:
After you seal those trouble spots, test the finish and recoat only where the surface protection has failed.
How to Refresh Stain and Protect High-Exposure Areas
Don’t recoat just because the surface looks a little tired. Recoat only when the finish fails a water test. If water beads up and runs off, hold off. If it soaks in or darkens the wood, it’s time to recoat [8].
For application, spray the stain or clear coat for even coverage, then back-brush right away while the product is still wet. That helps work it into the grain [4][8].
Give extra attention to the spots that take the most abuse:
- South- and west-facing walls
- Splashback zones
- Exposed log ends
- Deck or utility transitions [8][4][6]
Treat log ends with a specialized log end sealant. In most cases, that protection lasts 5 to 10 years [4].
Use the finish type as a rough guide for how often you’ll need to come back to high-exposure walls:
| Finish Category | Appearance | UV Protection | Maintenance Frequency |
|---|---|---|---|
| Transparent / Clear Coat | Shows all natural grain and knots | Lowest; acts as a sacrificial layer for the stain below | Every 2–4 years on high-exposure walls [8] |
| Semi-Transparent Stain | Shows grain with added pigment and color depth | Moderate to high; darker pigments offer more UV protection | Every 3–5 years [3][8] |
| Opaque / Solid Stain | Hides most grain; looks similar to paint | Highest UV blockage | Every 5–7+ years, location dependent [6] |
If you’re using a pigmented stain, apply a clear topcoat over it. Refresh that clear topcoat first, since it wears out sooner than the color layer [8].
After the exterior is protected, keep runoff, humidity, and pests under control.
Control Moisture, Track Maintenance, and Know When to Call for Help
How to Reduce Moisture and Pest Pressure Around the Home
Use the same perimeter walk you do in spring and fall. The goal is simple: keep water moving away from the house and keep the base open so air can move through.
Mulch pushed up against the logs holds moisture and gives insects an easy route into the wood. A gravel border drains fast and keeps organic material away from the base of the walls. Dense shrubs and plants can also cause trouble. They block sunlight and airflow, which means the logs stay wet longer after rain. That damp, shaded area is where rot and mold can start to take hold [8][6].
As you walk, watch for signs of insect activity, including:
If you spot water intrusion, soft wood, repeated dark stains, or insect activity, call your builder or manufacturer to discuss log home plans and structural integrity. Bring in a professional for steep areas or any work that needs scaffolding. And if you’re not sure whether a product will work with your current finish, or you need paperwork for a warranty, check with the manufacturer before changing products [1][11].
Before you wrap up the walk, add any trouble spots to your maintenance log.
Keep a Maintenance Log for Inspections and Receipts
Write down each inspection while it’s still fresh in your mind. A printed or digital log works fine, as long as you keep it up to date. Track your inspections, products, receipts, and moisture readings in one place.
Each entry should include:
- The date
- Photos taken from the same angles each time
- What you found
- What products you used, including brand, product name, and color code
- Moisture meter readings before any sealing or recoating work [10][1][8]
Over time, that record helps you spot patterns. You may notice that one side of the house wears out faster than the others, which makes it easier to plan and budget instead of scrambling after damage shows up. It also gives you documentation if a manufacturer asks for proof that you’ve cared for the home the right way during a warranty review [5][8][1].
Conclusion: Protect Your Home With Steady, Documented Upkeep
Protecting a cedar log home comes down to a steady routine: start maintenance right after construction, inspect it twice a year, keep water away from the logs, refresh finishes before they fail, and document the work.
Routine upkeep costs far less than putting off repairs.
If you have questions about approved maintenance methods or need to confirm what your product documentation requires, contact the manufacturer before switching products [1][11].
FAQs
How do I know when the finish is failing?
The exterior finish may be starting to fail if the topcoat or UV layer looks dull or worn out, especially on parts of the home that get the most sun, like the south side. Cracks or gaps are another red flag, because they can let water slip behind the finish.
It also helps to keep an eye out for water stains, mildew, or signs of rot around log ends, corners, trim, doors, and windows. A slow walk around the outside of the home twice a year can help you spot these problems before they turn into bigger repairs.
What happens if I recoat before the logs are dry?
Recoating before the logs are fully dry is a common mistake, and it can cause trouble fast. Moisture trapped under the coating can weaken adhesion, cut down the finish’s protective performance, and lead to early coating failure.
It can also lock in dust, pollen, or leftover cleaning residue. If you want to protect your cedar log home and help preserve warranty coverage, make sure the wood is dry before you apply stain or clear coat.
Which maintenance tasks should I do myself?
Most routine inspections and preventive care are simple enough to handle on your own.
That usually includes:
- Spring and fall perimeter checks for structural issues, insect activity, and gaps in chinking or caulking
- Annual exterior cleaning with mild detergent, a garden hose, and a soft-bristle brush
- Trimming vegetation 3 to 5 feet from walls and cleaning gutters and downspouts
You can also take care of minor clear coat or sealant touch-ups, as long as you first confirm the wood is dry with a moisture meter.