
Designing a log home floor plan requires careful planning to align your lifestyle, land, and budget. Cedar log homes have unique structural and aesthetic needs, from thick, insulating walls to settling over time, which impact layout decisions. Here’s a quick overview of the key steps to create a functional and visually appealing plan:
- Define Your Needs: Assess your lifestyle, site conditions (like slope and views), and set a realistic budget. Focus on essentials like room placement, privacy, and future needs.
- Organize Core Spaces: Prioritize the great room, kitchen, and dining area for functionality and flow. Use efficient layouts and highlight scenic views.
- Plan Private Areas: Position bedrooms for privacy, stack bathrooms to save costs, and add flexible spaces like lofts or bonus rooms.
- Log-Specific Considerations: Account for structural details like settling, log wall spans, and storage solutions early in the process.
- Indoor-Outdoor Connection: Design porches, decks, and garages to complement your home while considering climate and functionality.
Big Twig Homes offers customizable cedar log home kits, free design services, and energy-efficient SIP systems to simplify the process. Whether you’re building a family residence or a mountain retreat, these steps ensure your log home is tailored to your needs and site.
6 Steps to Design Your Cedar Log Home Floor Plan
Complete Tour of My Log Home Plans (Walkthrough Model)
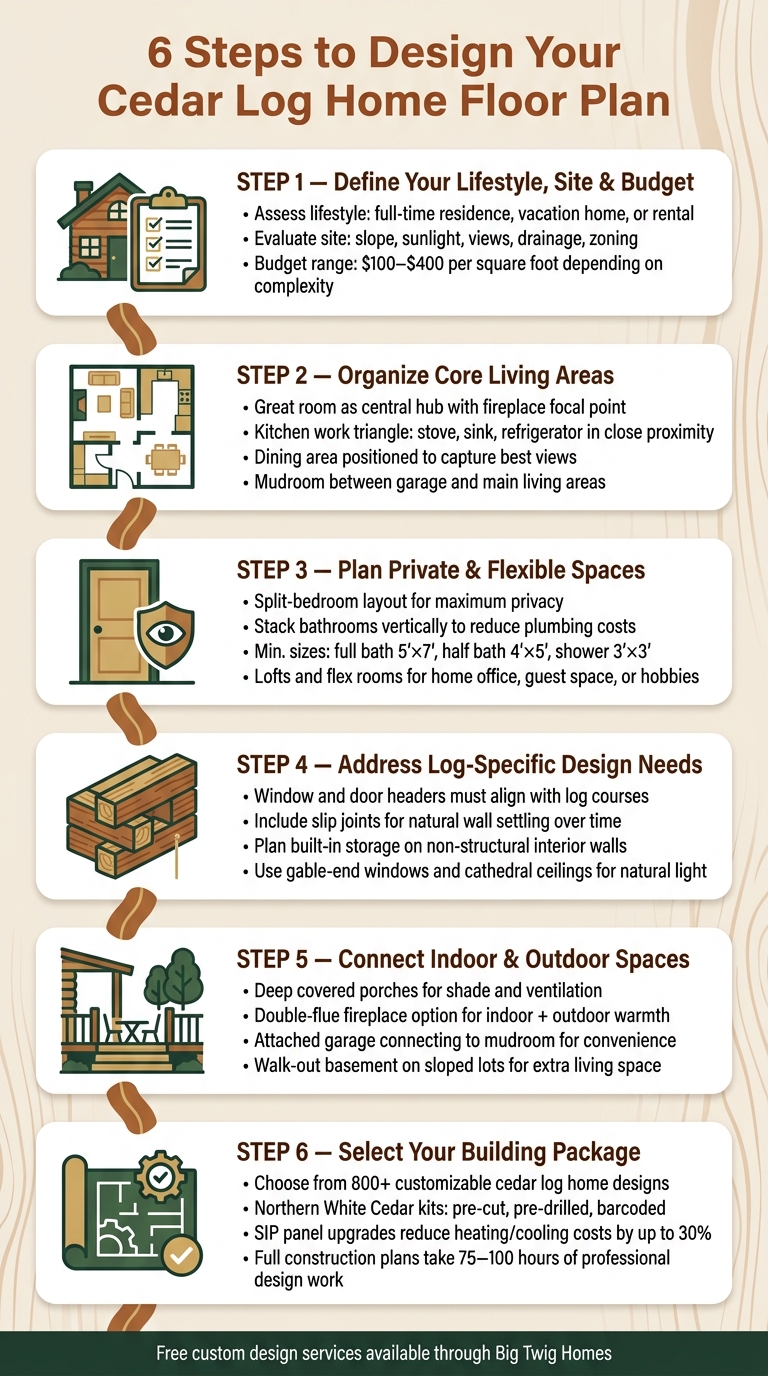
Step 1: Define Your Lifestyle, Site, and Budget
Before diving into design details, take a step back and address three key questions: How will you live in this space? What does your land require? And what is your budget? Tackling these upfront can save you from costly changes later.
Assess Your Lifestyle Needs
First, think about how you’ll actually use your home. A full-time family residence calls for durable layouts, ample storage, and distinct zones for living and sleeping. A vacation home, on the other hand, might embrace open, airy spaces. For a rental property, focus on durable materials and flexible layouts that appeal to a variety of guests.
Consider both your current and future needs. For example, many homeowners now prefer first-floor master suites for easier aging in place and day-to-day convenience. If you work from home, a dedicated office might be more important than an extra guest room. Love hosting? Then a spacious great room or a covered porch may top your list.
To stay organized, make two lists: must-haves and nice-to-haves. This will help you stay focused when it’s time to make budget decisions.
"We try to determine who and how many people will be living there and how they envision these spaces being utilized." – Brad Mercer, Sales Manager, Timberhaven Log & Timber Homes [3]
For a head start, companies like Big Twig Homes offer free custom design services. You can adapt an existing plan to suit your lifestyle without the high costs of starting from scratch [4].
Once you’ve outlined your lifestyle needs, it’s time to think about how your land will shape your design.
Evaluate the Building Site
Your lot’s features play a big role in determining your home’s layout and orientation. Factors like slope, sunlight, mature trees, and views all influence where rooms should go.
For instance, a south-facing home in the U.S. captures more sunlight throughout the day, cutting heating costs and brightening interiors. Placing living spaces like the kitchen or great room to face the best views helps create a stronger connection to the outdoors. Meanwhile, bedrooms and utility areas can face less scenic directions without much compromise.
Practical considerations also come into play. Slope and drainage might dictate whether a walkout basement is feasible. In colder climates, wind patterns and snowfall can affect the placement of porches, entries, and garages. Zoning laws and setback requirements could limit where you can build on the lot, so it’s smart to review these early to avoid surprises.
"To ensure your log home and land work together perfectly, we evaluate the space to maximize views, sun exposure, and natural beauty." – Big Twig Homes [4]
Align Your Design With Your Budget
Every design choice impacts your costs, and some decisions are pricier than others. Larger square footage, intricate rooflines, vaulted ceilings, and extra plumbing fixtures can all drive up expenses. Simplifying the layout – like stacking bathrooms on shared walls – can help keep costs down.
Log home construction costs range from $100 to $400 per square foot, depending on materials, design complexity, and location [5]. This wide range means your budget will depend heavily on your choices. Factors like shipping fees and site-specific conditions can also add to the overall cost, so getting detailed estimates early is crucial.
"Conversations typically begin with asking questions to understand what is most important to the client and how those priorities fit within their budget." – Robert Lockerby, CEO, Summit Handcrafted Log & Timber Homes [3]
Don’t forget to check local building codes early in the process. Requirements like ceiling heights, egress window sizes, or structural rules can all influence your floor plan. Addressing these foundational elements now will set the stage for a smoother design process later.
Step 2: Organize the Core Living Areas
Once you’ve outlined your lifestyle needs, considered the site conditions, and set your budget, it’s time to focus on organizing the spaces where everyday life unfolds. These core living areas shape how your home feels and functions. By carefully designing each space, you can create a home that fits seamlessly into your daily routine.
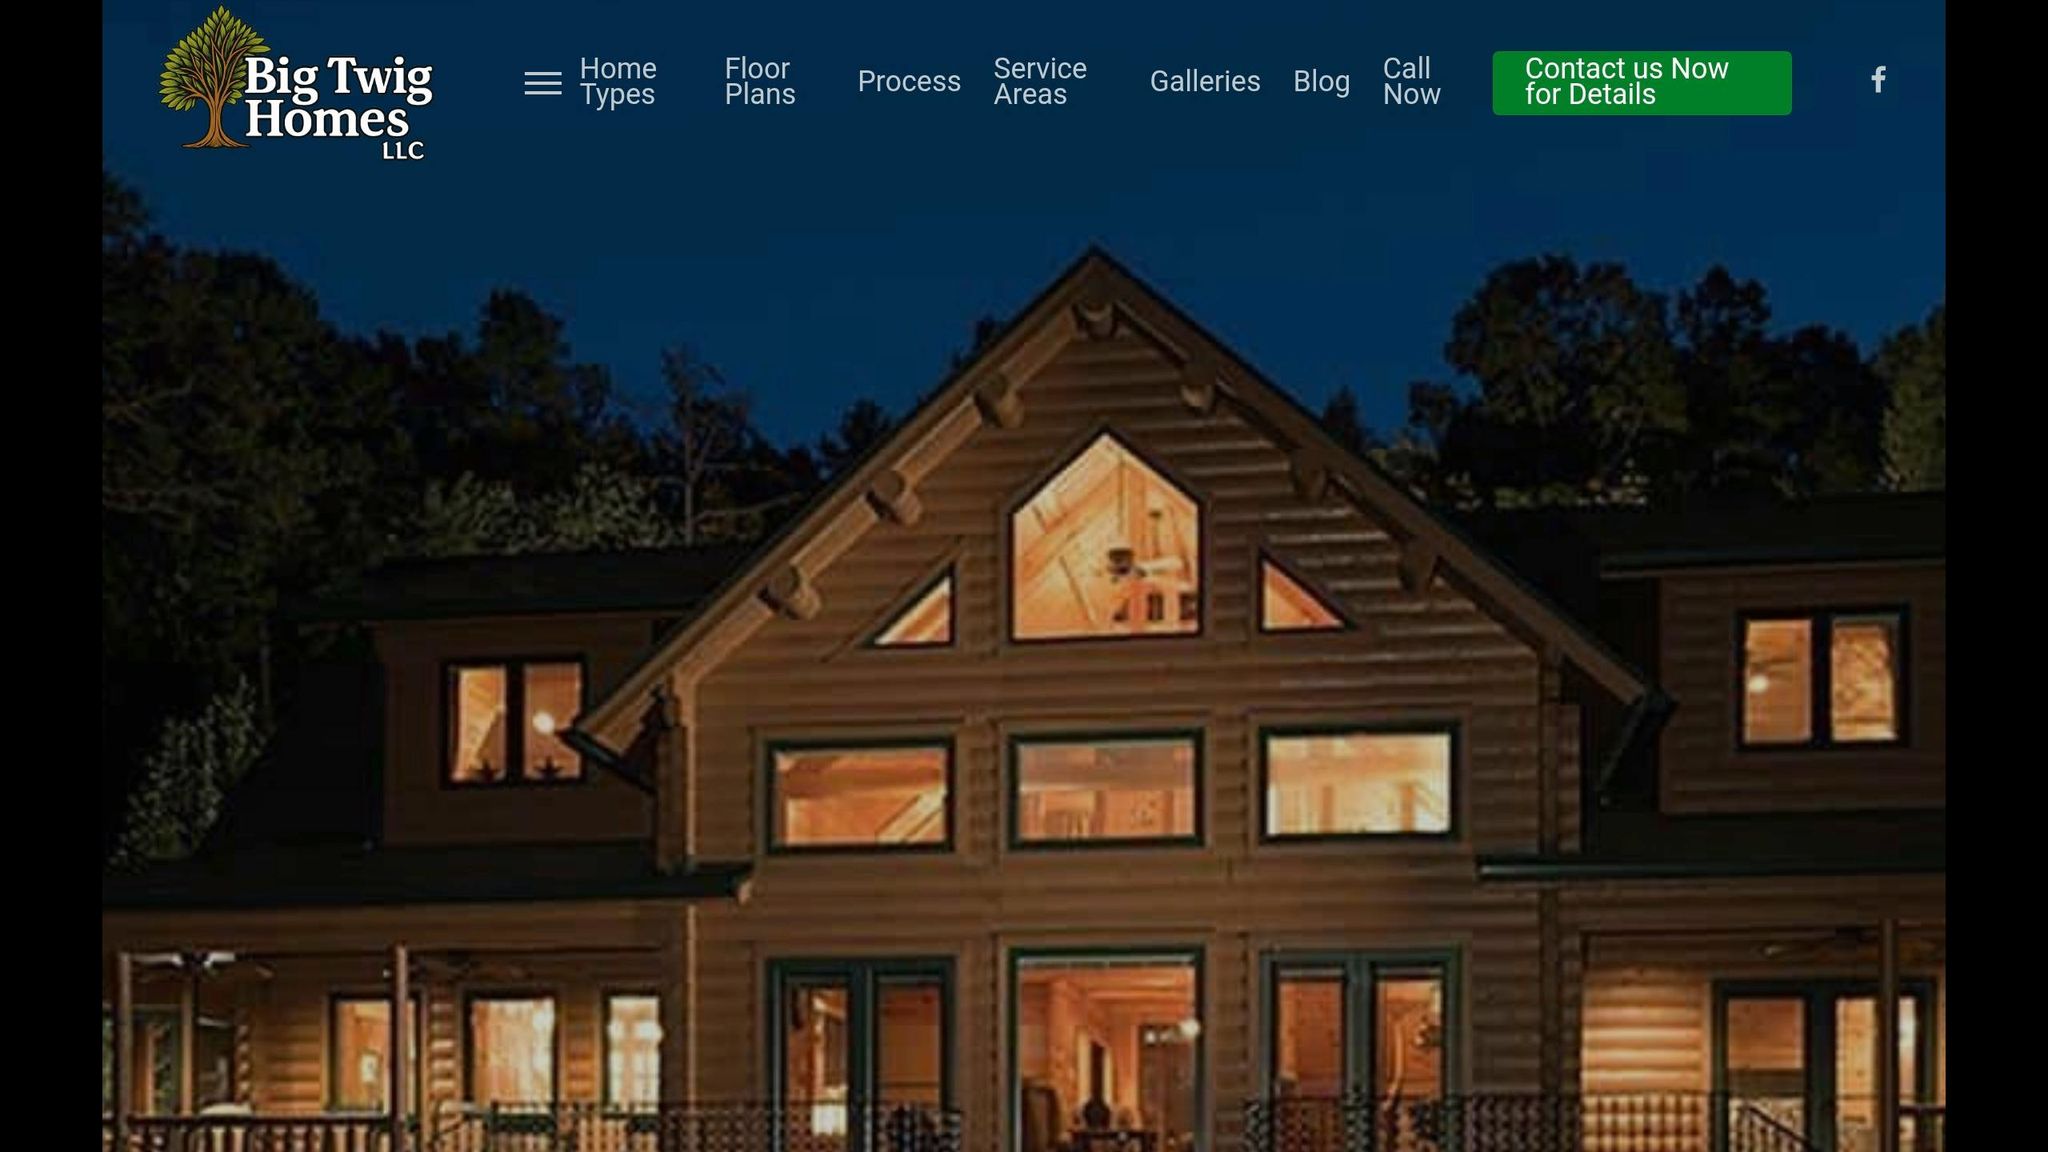
Design the Great Room as the Central Space
In a log home, the great room plays a starring role. With its vaulted ceilings, exposed beams, and expansive windows, this space becomes the heart of the home, offering both style and practicality.
"With items like grand great rooms, cathedral ceilings, and expansive covered porches, these homes not only elevate the visual appeal but also promote comfortable, open-concept living." – Big Twig Homes [1]
The fireplace is a key feature here. Placing it at the center of the great room creates a natural focal point while also helping to heat the home’s busiest areas [6]. For those on a budget, factory-built zero-clearance fireplaces can deliver the same cozy ambiance as traditional masonry ones at a fraction of the cost [6]. To enhance the space further, lightly sanding and finishing the cedar log walls highlights their natural beauty while making them easier to maintain [7].
Cedar log walls bring unique challenges and opportunities. Their thickness, load-bearing strength, and natural settling patterns influence decisions about ceiling heights, beam placement, and window size. Thoughtful planning here sets the tone for the rest of the home.
Plan an Efficient Kitchen Layout
A well-designed kitchen revolves around an efficient work triangle – the arrangement of the stove, sink, and refrigerator. Keeping these three elements in close proximity reduces unnecessary steps during meal prep [6]. "U" and "L" shaped layouts work particularly well, especially when paired with a central island. The island not only adds extra prep space but also becomes a natural gathering spot [6].
For functionality, aim to provide 24 inches of counter space beside the sink, 18 inches on either side of the range, and 18 inches near the refrigerator. Overall, plan for 8–10 linear feet of counter space and at least 18 square feet of storage [6]. Since log home packages often exclude cabinetry, plumbing, and electrical, it’s smart to coordinate with your builder early to ensure these elements fit seamlessly into the design.
"The seamless flow into the kitchen and dining area enhances the usability of the space, making it perfect for family gatherings and festive occasions." – Big Twig Homes [8]
Position the Dining Area for Views and Daily Use
The dining area serves as a bridge between the kitchen and the great room, making it easy to serve meals while staying connected to the main living space. To make the most of this room, position it to capture the best views your property has to offer. Large windows or glass doors can help blend indoor dining with outdoor scenery [1].
A great example of this approach is the Big Twig Homes Bayside floor plan. This design places the dining area in an open layout, connecting it to the kitchen and living space while offering access to wraparound decks and porches on three sides. These features create an inviting spot for entertaining and enjoying the outdoors [8]. Similarly, the Piscataquis design from Moosehead Cedar Log Homes includes an open-concept dining room with clear sightlines to the back deck in a spacious 3,632 sq. ft. layout [9]. Both designs show how thoughtful placement can transform a dining area into a highlight of the home.
Design a Functional Entry and Mudroom
In rural or mountain log homes, a mudroom is more than just a convenience – it’s a necessity. This hardworking space handles everything from muddy boots and wet dogs to ski gear and hunting equipment. For durability, consider flooring options like stone tile or sealed concrete, which can withstand heavy traffic better than wood.
Position the mudroom between the garage and the main living areas. Outfit it with practical features like built-in cubbies, hooks, a bench, and a utility sink to keep outdoor messes contained. If space allows, adding a coat closet or a dedicated storage wall for seasonal gear can help keep the area tidy and organized. This simple addition can make a big difference in maintaining a clutter-free home.
Step 3: Plan Private and Flexible Spaces
Once you’ve mapped out the main living areas, it’s time to focus on creating private spaces that prioritize comfort while allowing room for future adaptability.
Choose the Right Bedroom Placement
Where you place bedrooms can make a big difference in terms of privacy and comfort. A split-bedroom layout is a smart choice – this design places the primary suite on one side of the house and secondary bedrooms on the other. Not only does this maximize privacy, but it also avoids wasting space on long, unnecessary hallways.
Small design tweaks can further enhance privacy and reduce noise. For instance, positioning closets between bedrooms acts as a natural sound barrier. If your home is on a sloped lot, consider placing secondary bedrooms in a walkout lower level. This setup creates even more separation between sleeping areas and the main living spaces.
Plan Bathrooms to Reduce Costs and Improve Function
The placement of bathrooms impacts both the flow of the home and your construction budget. To save on plumbing costs, consider stacking bathrooms vertically or placing them back-to-back so they share a common plumbing wall. For reference, a full bathroom should measure at least 5’×7′, a half bath 4’×5′, and a shower stall 3’×3′ [6].
In a two-bedroom layout, a shared full bath between the bedrooms can serve both efficiently. Meanwhile, a separate half bath near the living area ensures guests don’t need to pass through private spaces. Placing bathrooms on the north side of the home is another practical tip, as these areas typically receive less natural light and are better suited for utility spaces.
"A great floor plan makes a log cabin feel twice its size. A bad one wastes every square foot." – Log Cabin USA [10]
With bedrooms and bathrooms thoughtfully planned, you can turn your attention to creating flexible spaces that adapt to changing needs.
Add Multiuse and Bonus Spaces
Lofts are a fantastic addition to a log home floor plan. Thanks to the open, vaulted design of log homes, lofts naturally fit above the great room and can serve multiple purposes – whether as a home office, guest space, reading nook, or play area for kids. Adding gable-end windows or skylights can make the loft feel bright and welcoming.
If you’re considering a flex room for activities like working out, crafting, or studying, think about including a closet in the design. Many building codes require a closet for a room to be classified as a bedroom, which can boost resale value if your needs change down the road. Since log walls are structural and permanent, planning these details early is key to avoiding costly changes later.
sbb-itb-1086e16
Step 4: Design Considerations Specific to Log Homes
Log homes operate under a unique set of structural principles compared to traditional stick-built houses. Getting familiar with these early in the design phase can help avoid unnecessary expenses and headaches down the road.
Work Within Log Wall Structures and Spans
In log home construction, the log itself serves as the basic building block. Its diameter determines the height of each course, which means every window header, door frame, and wall opening must align with these predetermined increments.
"Window and door headers must land on a log course. You can’t just adjust a rough opening like in conventional framing." – BIM Heroes [11]
Log walls settle over time due to gravity and moisture changes, which affects elements like stairs, partition walls, and roof systems. To address this, include floating details such as slip joints to allow for natural movement. This approach also influences other design aspects, like built-in storage and how natural light is incorporated. For large open spaces, such as great rooms with cathedral ceilings, heavy timber trusses or purlin-style roof systems are often necessary to span distances beyond the length of standard logs.
The type of log profile you select will also impact your interior layout. For example, D-logs provide a flat interior surface, making it easier to install cabinetry or partition walls, while round logs require more precise planning to account for their curved edges. Once structural details are sorted, you can design storage solutions that fit seamlessly into these constraints.
Build In Storage From the Start
Storage is another critical factor in log home design. Since log walls are permanent, planning for built-in storage during the design phase is essential to avoid expensive retrofitting later. Under-stair storage is a popular choice, but remember that staircases should use floating designs with slip joints to accommodate the natural settling of log walls.
For heavier storage solutions like custom shelves or cabinets, it’s best to attach them to non-structural interior walls made of materials like drywall or stone, rather than directly to the log walls. Window seats are another clever addition – they provide extra seating, storage, and aesthetic appeal without requiring structural adjustments.
"To maximize space in a log home, focus on open floor plans, multi-functional furniture, and built-in storage solutions." – Big Twig Homes [2]
Integrate More Light and Frame the Views
Log homes often benefit from designs that embrace natural light and highlight scenic views. Full gable walls filled with windows and cathedral ceilings are excellent ways to achieve this.
"A gable wall of windows to take advantage of a beautiful view, or just a lot of windows in general to bring in lots of natural light are popular." – Brad Mercer, Sales Manager, Timberhaven Log & Timber Homes [3]
Cathedral ceilings not only allow for stacked rows of windows but also create a spacious, airy atmosphere that helps offset the darker tones commonly associated with log interiors. Adding a loft can further enhance light distribution by providing an elevated perspective.
To brighten the interior, consider using lighter finishes like white-painted drywall, shiplap, or stone accent walls. These materials create a reflective contrast against the natural grain of cedar or other wood types. Additionally, each window opening should include a keyway or spline system to account for the movement of the log walls over time.
Step 5: Connect Indoor and Outdoor Spaces
Once you’ve finalized your interior layout, it’s time to think about how your log home will blend with the outdoors. A well-thought-out connection between indoor and outdoor spaces not only boosts functionality but also enhances the natural charm of your home.
Design Porches and Decks for Outdoor Living
Porches and decks are more than just add-ons – they’re extensions of your living space. Whether you’re surrounded by mountain views, a serene tree line, or a quiet backyard, these spaces help you embrace your surroundings.
When designing porches, consider your local climate. In warmer areas, deep covered porches provide shade and improve ventilation. For cooler regions, screened or partially enclosed porches allow you to enjoy the outdoors comfortably year-round.
A double-flue fireplace is a functional and stylish feature to consider. With one chimney serving both an indoor room and an adjacent porch or deck, you can enjoy the warmth of a fire outdoors while keeping firewood and ashes outside.
"We do a fair amount of double flue fireplaces, so there is one in the great room and one on the porch or deck… you can keep the firewood and ashes outdoors." – Brad Mercer, Sales Manager, Timberhaven Log & Timber Homes [3]
If you’re thinking about adding heavier features like a hot tub or a masonry fireplace to your deck, bring it up early in the design process. Proper floor framing and reinforcement will be essential to handle these loads [3]. Finally, practical entry solutions, like well-placed doors, help tie these outdoor spaces seamlessly into your home’s layout.
Plan Garage Placement and Interior Access
Comfort isn’t just about outdoor living – it’s also about practical access. An attached garage is a smart choice for convenience, especially when it connects to a mudroom or a generously sized laundry room. These spaces can double as functional hubs for hobbies or even include extras like a dog wash station to simplify daily chores.
"Attached garages, large laundry and mud rooms incorporating dog washes, home offices, and spaces dedicated to the pursuit of hobbies also top the list for prospective log or timber homeowners." – Mike Haskew, Author, Log Cabin Homes Magazine [3]
Accessibility is another important factor. Brad Mercer from Timberhaven advises making all first-floor connecting doors – such as those between the garage and mudroom – at least 30 inches wide. This ensures they can accommodate wheelchairs or mobility aids without requiring future adjustments [3].
In some cases, a detached garage or a carriage house-style design might be a better fit. This can be especially useful if you need a workshop or want to keep certain activities separate from your main living areas.
Make Use of Lower-Level Spaces
If your property has a slope, a walk-out basement is a fantastic way to expand your living space without altering the home’s overall profile. These lower levels are perfect for recreation rooms, home offices, or extra storage. By incorporating large windows or glass walls, you can create a bright and open atmosphere that feels just as connected to the outdoors as the upper levels.
When planning these spaces, think ahead about structural needs. Heavy items like pool tables or masonry fireplaces require reinforced floors, so it’s best to address these during the design phase [3]. For long-term usability, consider adding an elevator or lift to ensure these areas remain accessible as your needs change [3].
Step 6: Work With Big Twig Homes on a Custom Package
Once you’ve planned your indoor and outdoor spaces, it’s time to turn your floor plan into a fully realized building package. Big Twig Homes, led by Aaron and Meredith Dunn, specializes in providing top-notch materials, expert design services, and access to skilled builders. Their process connects your creative vision with practical construction solutions.
Start With Cedar Log Home Kits
Big Twig Homes offers a collection of over 800 customizable log home designs from trusted suppliers like Moosehead Cedar Log Homes. These designs serve as a great starting point, helping you quickly find layouts that reflect your style. After selecting a plan, the team can tailor it to fit your site, lifestyle, and budget – at no additional cost when you purchase a log home package.
"We can modify a current plan or create a new log home or cabin plan for free. We will help you choose the right option for your preferences and ensure you select an option that fits your budget." – Big Twig Homes [4]
Prefer to start from scratch? Custom plans are available for a design fee ranging from $1,500 to $5,000 [2]. All log home kits feature Northern White Cedar, which is known for its lower water content compared to pine. This helps reduce cracking and enhances long-term stability. Each kit is delivered pre-cut, pre-drilled, and bar-coded in the exact sequence needed for efficient on-site assembly [7].
Upgrade With SIP and Panelized Systems
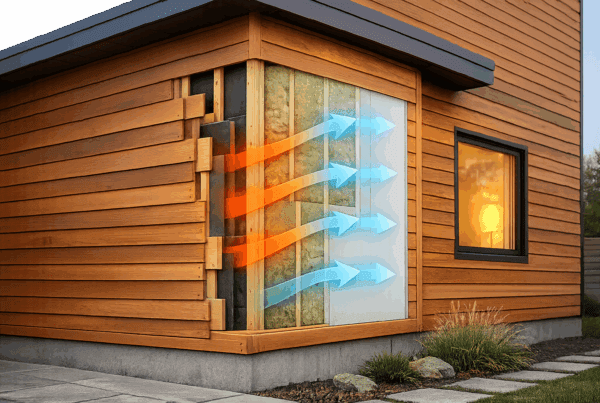
To boost energy efficiency, Big Twig Homes provides SIP panel packages through EPS Building Systems. These panels, constructed with EPS or GPS foam sandwiched between OSB layers, offer impressive strength and minimize air leakage [2]. Homes built with SIP panels can reduce heating and cooling costs by up to 30% [1]. Available in jumbo sizes up to 8′ x 24′, these panels minimize seams, strengthening the building’s overall structure. Each SIP package is pre-cut to match your floor plan and includes fully engineered, stamped drawings [2], simplifying the construction process and helping you move in sooner.
Work Closely With Suppliers and Builders
Early collaboration with your builder and suppliers is essential to ensure your floor plan transitions smoothly to construction. Big Twig Homes partners with a network of experienced builders across North Carolina, South Carolina, Georgia, and Tennessee who specialize in log home construction. Engaging with your builder early allows you to address important factors like zoning regulations, structural modifications, and site orientation for optimal sun exposure and views. This proactive approach ensures your design works for your specific lot, stays within your budget, and keeps your project on schedule.
Conclusion: Turning Your Floor Plan Into a Finished Home
The process of creating a cedar log home floor plan comes together step by step, ultimately leading to a design that’s ready for construction.
It all begins with understanding how you live – your daily habits, the unique features of your site, and your budget. From there, the plan takes shape: arranging shared spaces, designing private areas, blending indoor and outdoor elements, and selecting a material package that simplifies the building process. It’s worth noting that preparing a full set of construction plans for a typical 2,000-square-foot log home can take 75 to 100 hours of professional design work [5]. This is why it’s crucial to finalize any changes during the preliminary plan stage [5].
Big Twig Homes, founded by Aaron and Meredith Dunn, aims to make this process as seamless as possible. They offer free design services, access to over 800 customizable plans through Moosehead Cedar Log Homes, and precision-manufactured Northern White Cedar packages. These packages come pre-cut, pre-drilled, and barcoded for easy assembly, ensuring a straightforward path from design to construction [7].
"Building a log home is simple, easy and rewarding as well. At Big Twig Homes, we know what it takes to build your dream home without everything being complicated or confusing." – Big Twig Homes [12]
With a floor plan tailored to your land, lifestyle, and budget, paired with a carefully selected material package, your dream home can become a reality. Contact Big Twig Homes to take the first step.
FAQs
What should I decide before choosing a log home floor plan?
Before choosing a floor plan, make sure you’ve secured your land and established a clear budget. Evaluate the land’s features, including its topography, soil conditions, and sun exposure, to ensure the design complements the environment. Think about your lifestyle needs – how many bedrooms and bathrooms you’ll need, the type of activity spaces you want, and your long-term priorities like energy efficiency or extra storage. Big Twig Homes can work with you to align your design choices with both your vision and your financial plan.
How does log wall settling affect window, door, and stair design?
Log wall settling demands designs that accommodate the natural vertical movement of wood. For windows and doors, a settlement gap – usually about 1.5 inches – is essential above the bucks. This gap should be packed with insulation or foam and concealed using sliding trim, allowing adjustments as the logs settle. When it comes to staircases, builders need to ensure that any attachments to settling walls are designed to handle height changes, ensuring the stairs remain level and usable as the structure shifts over time.
What’s the easiest way to keep a log home layout flexible for the future?
To make a log home layout adaptable, begin with an open-concept design. Work closely with design professionals to craft a floor plan that lets in plenty of natural light and can evolve with your needs over time. Think about both your present lifestyle and future plans, like turning the space into a retirement-friendly home, and share these details with your representative. Big Twig Homes provides custom design services to create layouts that align with your vision.